If you’ve had your missing teeth replaced with dental implants, then congratulations on receiving the most effective form of tooth replacement available. The work isn’t done, though. You still have to take care of your new teeth, which involves flossing on a regular basis. Not only will this aid in better oral health, but it will help to maintain your implants and gorgeous smile. To get some easy tips for flossing dental implants, keep reading!
Flossing Safely and Effectively
Your diligence in flossing your implants will definitely pay off. Most importantly, it will help prevent the development of gum disease. The malleable design of floss allows it to maneuver into the tight spaces where bacteria and leftover food particles become lodged. To see the benefits, though, you have to be careful in your approach. The process of flossing with implants is a little more involved than with original teeth, but it’s still quite manageable.
Using a Floss Threader
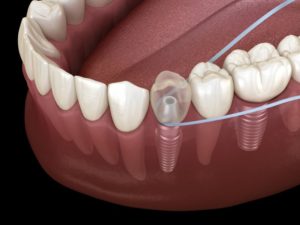
The floss threader is considered to be the most effective form of implant flossing. It consists of a small handheld device with a loop on one end and a stiff flat edge on the other. To use it, you’ll first pull around 18 inches of dental floss and thread it through the loop.
Next, you’ll carefully insert the sharper edge between the gums and implants, moving from the cheek side toward the tongue. As the floss approaches the tongue, you’ll hold one end of the floss and pull the floss threader away with the other, until the floss is underneath the tooth.
In essence, you’re lassoing each implant like a cowboy in a calf roping competition. Hopefully, this analogy makes things a little simpler.
The Actual Cleaning Process
Now that you’ve corralled the implant, it’s time to start cleaning. You’ll loop each end of the floss around your middle finger on each hand, and carefully work the floss up and down the sides of the nearest tooth or implant. Next, release one hand so the floss can escape from beneath the restoration. To clean the next section, you’ll just repeat the process.
Alternative Cleaning Methods
If you desire a method that requires a little less coordination, you may consider trying an oral irrigator (also called a water flosser). The apparatus emits a pressurized mist of water that helps to free trapped particles and plaque.
Another option is to use an interproximal brush, which is designed to probe the narrow spaces to agitate and remove debris. Just be sure not to choose the kind made with metal wire, as it could scratch your implants.
In addition to preventing the development of gum disease, diligently cleaning in the hard-to-reach spaces will help to extend the life of your implants and restoration. Therefore, you can look forward to enjoying decades of smile bliss!
About the Author
Dr. Nelson Y. Howard earned his dental degree from the UCLA School of Dentistry. Because no two patients are ever the same, he combines his vast knowledge, 30+ years of experience and continued creativity to achieve optimal dental solutions. Dr. Howard places dental implants at his private practice, and he can be reached for more information through his website.